


Ice and Water Shield Requirements and Where It Goes
 12min Read
 Posted 11.04.2025
That Water Stain on Your Ceiling? It Started Months Ago.
Here’s something most Twin Cities homeowners don’t realize: by the time you see water damage inside your house, ice has been quietly working its way under your shingles for weeks. Minnesota averages 33 freeze-thaw cycles every winter—that’s 33 chances for ice to pry up your roofing and let water sneak in where it doesn’t belong. The fix isn’t complicated, but it needs to happen before the damage does. It’s called ice and water shield, and if your roof doesn’t have it in the right places, you’re basically gambling with your home every time the temperature bounces above and below freezing.
Why Twin Cities Homeowners Can’t Ignore This
Let’s talk about what’s actually happening up there on your roof when temperatures yo-yo between 15°F and 35°F (which, let’s be honest, is half of January through March around here).
Snow melts during the day. That water trickles down toward your gutters. Then night hits, temps drop, and that water freezes solid right at the edge of your roof—the coldest spot. More melt, more freeze, and suddenly you’ve got a ridge of ice blocking the path. Now water has nowhere to go but backwards, pooling under your shingles, soaking into your roof deck, and eventually making its way to that ceiling you just painted.
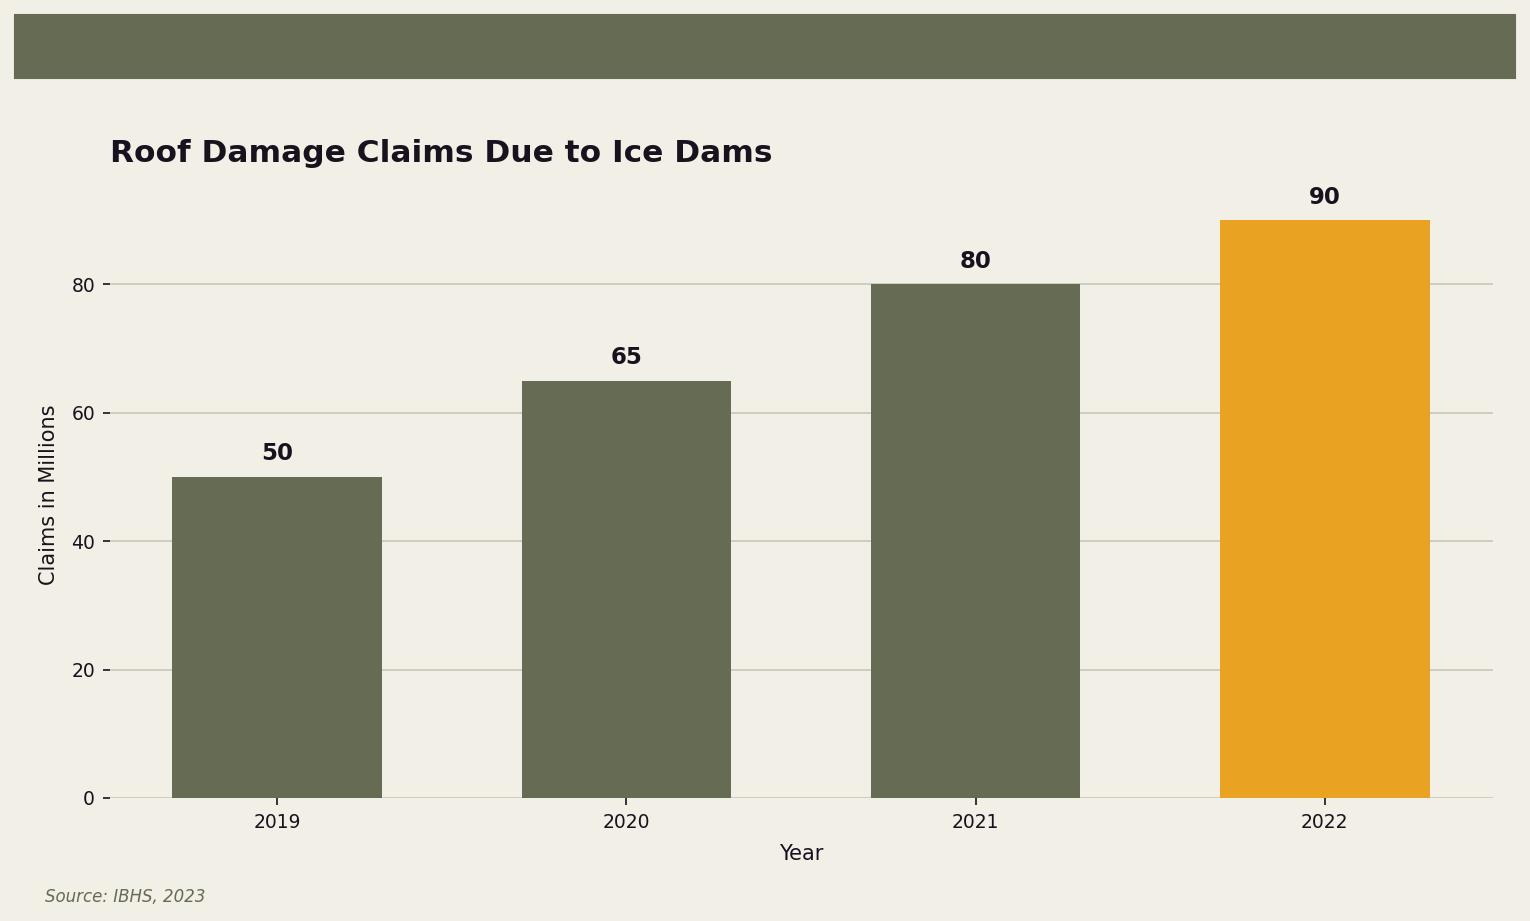
That’s an ice dam. And according to the Insurance Institute for Business & Home Safety (IBHS), they’re responsible for millions in claims annually across cold-climate states. The frustrating part? Most of that damage is preventable.
The National Roofing Contractors Association (NRCA) recommends ice and water shield as a critical component for homes in cold climates—not as a nice-to-have, but as a fundamental part of proper roof construction. In Minnesota, it’s not just smart. For many roof configurations, it’s code.
What Exactly Is Ice and Water Shield?

The Simple Explanation
Think of ice and water shield as a sticky, rubbery insurance policy that goes directly onto your roof deck, underneath your shingles. It’s a self-adhesive membrane made of rubberized asphalt that does something pretty clever: it seals around nail holes.
Why does that matter? Because every shingle on your roof is held down by nails, and every nail creates a tiny hole. Under normal circumstances, shingles overlap enough that water never reaches those holes. But ice dams don’t play by normal rules. When water backs up under shingles, it finds those nail penetrations. Regular roofing felt (tar paper) doesn’t seal around nails—water goes right through.
Ice and water shield is different. When a nail punctures it, the rubberized material grips the nail shaft and seals tight. Water hits a dead end. Your roof deck stays dry. Your ceiling stays stain-free. You sleep through the night instead of listening for drips.
Where Does Ice and Water Shield Actually Go?
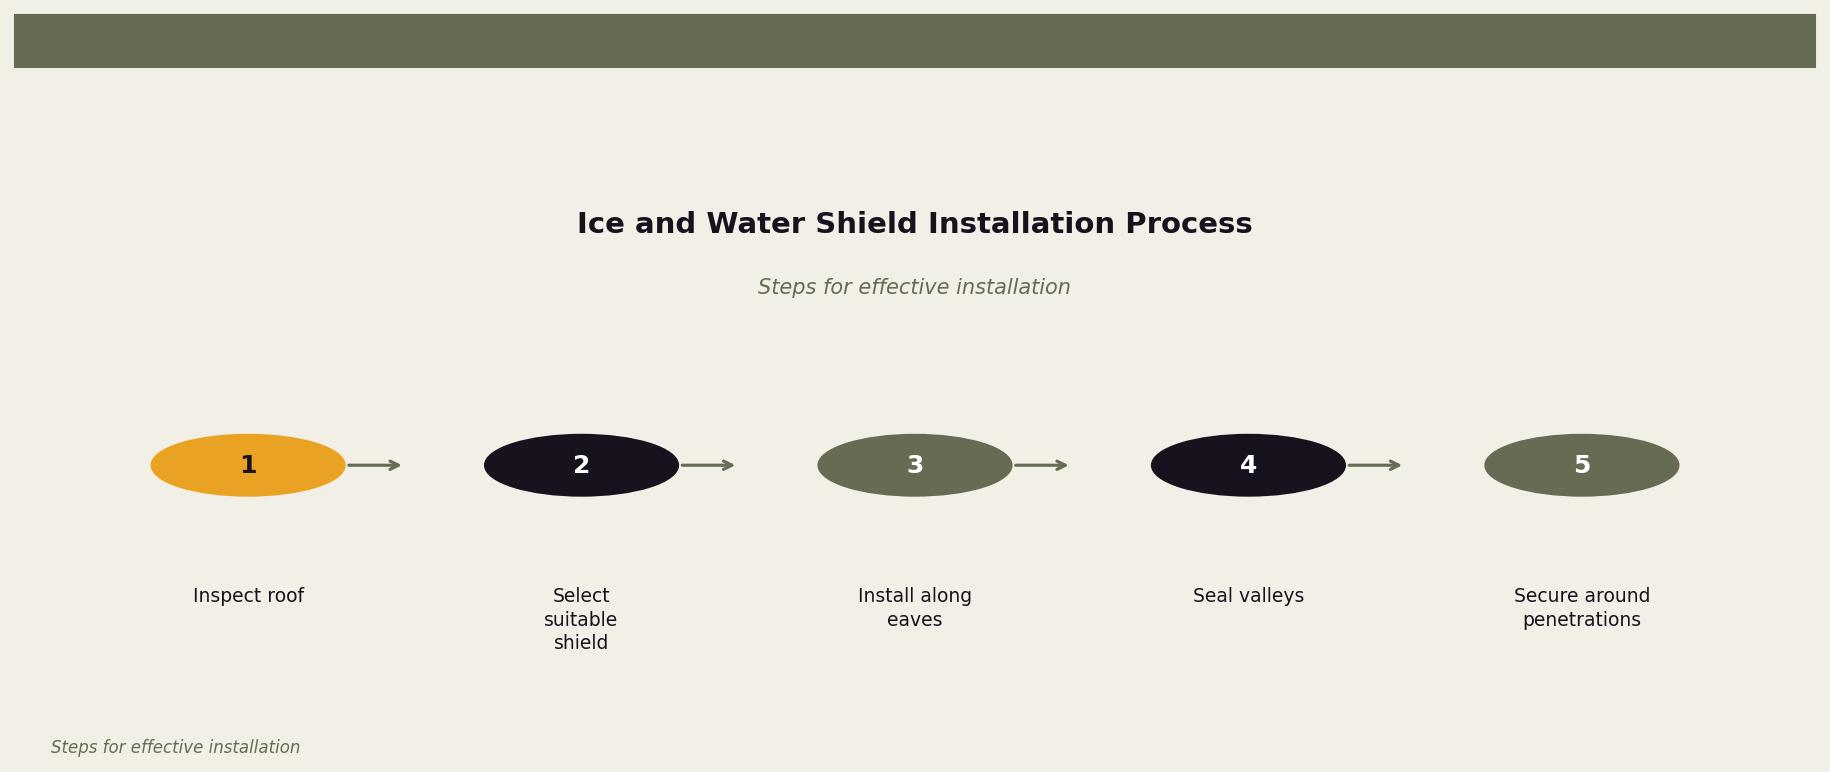
Placement matters more than most people realize. Slap it in the wrong spots (or skip the right ones), and you might as well have saved your money. Here’s where the NRCA says it needs to be:
- Along the eaves: This is non-negotiable in Minnesota. The shield should extend from the edge of your roof up past the exterior wall line—typically 24 inches minimum past the wall. This covers the “ice dam zone” where backup is most likely to occur.
- In the valleys: Valleys are where two roof planes meet, creating a natural channel for water. They’re also where debris collects and ice loves to build up. Ice and water shield should run the full length of every valley.
- Around roof penetrations: Chimneys, skylights, vent pipes, bathroom exhaust fans—anywhere something pokes through your roof is a potential leak point. The shield wraps around these penetrations as a waterproof collar.
- On low-slope sections: Got a porch roof or addition with a gentler pitch? Water moves slower on low slopes, giving it more time to find its way in. Minnesota building code typically requires ice and water shield on any roof section with a slope less than 4/12.
Miss any of these areas, and you’ve left the door open for water damage. Cover them all, and you’ve got a roof that can handle whatever our winters throw at it.
Not All Ice Shields Are Created Equal
Types You’ll See on the Market
Walk into a roofing supply store and you’ll find several ice and water shield options. The differences aren’t just marketing—they affect how well the product performs on your specific roof:
- Standard granulated surface: The most common type. The granules allow shingles to adhere better and let roofers walk on it without slipping. Good all-around performer for most residential applications.
- Smooth surface: Typically used under metal roofing or in valleys where a slicker surface helps water sheet off faster. Not ideal under standard shingles.
- High-temperature versions: Some ice and water shields can get soft and shift under extreme heat—a real concern on south-facing roof sections in summer. High-temp formulas stay stable even when your roof surface hits 150°F+.
- Thicker membranes: Premium options offer 40 mil or heavier thickness compared to standard 36 mil products. According to a report by North American Roofing (NAR), a thicker shield can reduce the likelihood of leaks by up to 40% compared to standard options.
Picking the Right One for Your Home
Here’s the honest truth: the “best” ice and water shield depends on your roof, not on what’s cheapest or most expensive. A few questions worth considering:
- What’s your roof pitch? Steeper roofs shed water fast and may do fine with standard products. Low-slope sections need thicker, more aggressive protection.
- How much sun does your roof get? South-facing slopes in Shoreview can get brutally hot in July. High-temp formulas prevent the membrane from softening and shifting.
- What’s your shingle color? Dark shingles absorb more heat, which transfers to everything underneath. Another vote for high-temp products.
- How old is your roof deck? Older plywood may have minor imperfections that thicker membranes bridge better than thin ones.
A good roofer will factor all of this in when recommending products—not just grab whatever’s on the truck.
Minnesota Weather: Why We Can’t Roof Like They Do in Texas
Our climate is genuinely different from most of the country, and roofing practices need to match. The Minnesota Department of Natural Resources documents an average of 33 freeze-thaw cycles each winter. Some winters it’s more. That constant expansion and contraction stresses every component of your roof.
Then there’s the snow load issue. A heavy, wet Minnesota snowfall can dump 20+ pounds per square foot on your roof. As that snow melts unevenly—faster near warm spots, slower at the edges—you get the perfect recipe for ice dams.
This is why local building codes in the Twin Cities area often require ice and water shield on roofs with slopes less than 4/12. It’s also why any roofer worth hiring will recommend extending coverage beyond code minimums in trouble-prone areas. Code is the floor, not the ceiling.
And here’s something else to consider: insurance companies are paying attention. After major ice dam events, some carriers have started requiring proof of proper ice and water shield installation before they’ll underwrite policies on older homes. Getting it right isn’t just about preventing damage—it’s about protecting your insurability.
The Real Cost of Waiting
Here’s a stat that should make you uncomfortable: according to the IBHS, 73% of homeowners don’t inspect their roof until there’s visible damage. By then, you’re not preventing problems—you’re paying to fix them.
A proper ice and water shield installation during a roof replacement adds relatively little to the overall project cost—usually a few hundred dollars depending on your roof size and how much coverage you need. Compare that to what water damage actually costs:
- Ceiling repair and repainting: $300–$1,000+
- Insulation replacement in affected areas: $500–$2,000
- Drywall replacement: $500–$1,500
- Mold remediation (if water sits too long): $1,500–$10,000+
- Emergency roof repair in winter: Premium pricing plus difficulty finding available crews
The math isn’t complicated. A small upfront investment beats a large, stressful bill any day—especially when that bill comes in February and you’re competing with every other homeowner in the metro for repair slots.
What You Should Do Right Now
Whether you’re planning a roof replacement soon or just want to know where you stand, here’s a practical action plan:
If You’re Getting a New Roof
- Ask specifically about ice and water shield. Where will it go? How far up from the eaves? What product are they using? A good contractor will walk you through this without getting defensive.
- Get it in writing. Your proposal should specify ice and water shield locations and product specifications. “Industry standard” isn’t a specification.
- Don’t automatically take the cheapest bid. Skimping on underlayment is an easy way for contractors to shave costs. You won’t notice for years—until you do.
If You’re Staying with Your Current Roof
- Schedule a roof inspection. Not next spring. Now—before winter damage accumulates.
- Ask about your current ice and water shield coverage. If your roof was installed before modern codes, it may not have any, or may have inadequate coverage.
- Watch for warning signs: Ice buildup at eaves larger than a few inches, icicles forming in unusual spots, water stains that appear after thaws. These suggest your ice dam protection isn’t cutting it.
General Good Practices
- Keep gutters clean so meltwater can drain properly
- Ensure your attic has adequate ventilation (warm attics accelerate ice dam formation)
- Check attic insulation levels—heat escaping into your roof space causes uneven melting
- After heavy snows, consider roof raking the first few feet above your eaves
Time to Protect Your Nest
If you’ve made it this far, you know more about ice and water shield than most homeowners—and you know it matters. The question now is whether your roof has the protection it needs.
At Owl Roofing, we’ve seen what Minnesota winters do to roofs that aren’t properly protected. Ice dams, water stains, rotted decking, frustrated homeowners—we’ve helped neighbors through all of it. We’re based right here in Shoreview and serve the entire Twin Cities area. No franchises, no storm chasers—just Tim, Bea, Noah, Anya, and a crew that’s been doing this work together for over 15 years combined.
If you’re wondering whether your current roof has adequate ice and water shield coverage—or you’re planning a replacement and want to make sure it’s done right—give us a call at 651-977-6027 or visit owlroofing.com/. We’ll take a look, tell you exactly what’s there (and what’s not), and give you honest options. No pressure, no scare tactics. Just straight answers from neighbors who understand what our winters demand.
Protect Your Nest.
📍 Owl Roofing Serves the Entire Twin Cities Metro
Andover · Anoka · Apple Valley · Arden Hills · Big Lake · Blaine · Bloomington · Brooklyn Center · Brooklyn Park · Burnsville · Champlin · Chanhassen · Chaska · Columbia Heights · Coon Rapids · Cottage Grove · Crystal · deephaven · Delano · Eagan · East Bethel · Eden Prairie · Excelsior · Farmington · Forest Lake · Fridley · Golden Valley · Ham Lake · Hastings · Hopkins · Hugo · Inver Grove Heights · Lake Elmo · Lakeville · Lino Lakes · Mahtomedi · Maplewood · Mendota Heights · Minneapolis · Minnetrista · Mound · Mounds View · New Brighton · New Hope · North Oaks · North St. Paul · Oak Grove · Oakdale · Plymouth · Prior Lake · Ramsey · Richfield · Robbinsdale · Rosemount · Roseville · Saint Paul · Savage · Shakopee · Shoreview · South St. Paul · St. Louis Park · St. Michael · St. Paul · Stillwater · Vadnais Heights · Victoria · Waconia · wayzata · West St. Paul · White Bear Lake · woodbury
Licensed Minnesota roofing contractor · Free inspections · 10-year workmanship warranty · Get a free estimate →
