


Will Roofing Damage Your Landscaping How to Prepare
 11min Read
 Posted 1.21.2026
Will Roofing Damage Your Landscaping? How to Prepare
A typical roof replacement drops 2,000 pounds of debris onto your property — and your hydrangeas didn’t sign up for that. If you’ve spent years nurturing your Twin Cities yard through brutal winters and scorching summers, watching shingles rain down on your perennials sounds like a nightmare. But here’s the good news: with some simple prep work, your landscaping can survive roofing day without a scratch.
You’ve got a problem. Your roof needs replacing, but your garden doesn’t deserve to become a construction casualty. Let’s walk through exactly how to protect your outdoor space so both your home and your hard-won curb appeal come through in one piece.
Why Your Landscaping Is at Risk (And Why It Matters)
Your roof does the heavy lifting when it comes to protecting your home from Minnesota’s wild weather swings. But during a replacement project, that protection temporarily becomes a threat to everything below it.
The National Roofing Contractors Association (NRCA) doesn’t sugarcoat it: roofing projects generate serious debris. Old shingles, rusty nails, torn tar paper, metal flashing — all of it has to come off your roof and go somewhere. Without a plan, “somewhere” often means your flower beds, vegetable garden, or that Japanese maple you babied through three polar vortexes.
For Twin Cities homeowners, the stakes feel higher. Our growing season is short enough without having crushed hostas setting you back another year. And let’s be honest — you didn’t spend your weekends mulching and weeding just to watch a roofer’s boot print flatten your daylilies.
Protecting your landscaping isn’t just about aesthetics (though curb appeal matters when you’re competing with the neighbors). It’s about avoiding the frustration and expense of replanting, re-sodding, and repairing after your roofing crew packs up. A little preparation now saves a lot of heartache later.
Understanding What Actually Happens During a Roof Replacement
The Debris Situation Is No Joke
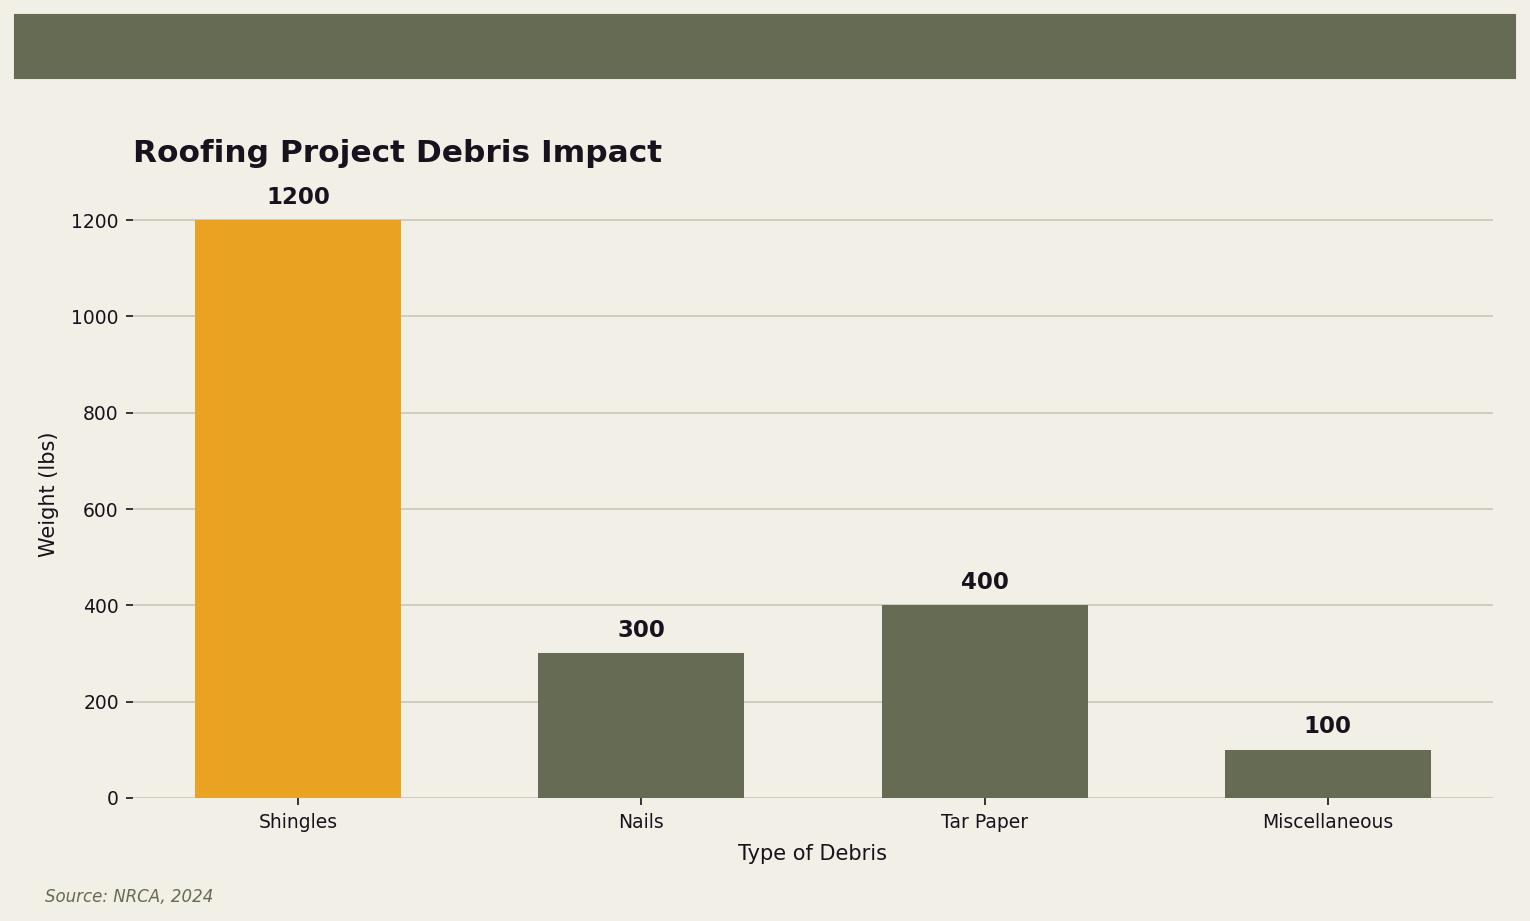
Let’s talk numbers. According to the Insurance Institute for Business & Home Safety (IBHS), a standard roof replacement generates up to 2,000 pounds of debris. That’s a full ton of materials coming off your roof, and gravity doesn’t care where your prize-winning roses are planted.
Here’s what’s typically falling:
- Old shingles: The bulk of the weight — roughly 1,200 pounds on an average home. These slide, tumble, and scatter.
- Nails: Around 300 pounds of them, and they’re sharp, rusty, and eager to puncture bare feet, pet paws, and garden hoses for years to come if not properly collected.
- Tar paper and underlayment: Another 400 pounds of material that tears into pieces and blows around.
- Miscellaneous debris: Flashing, vent covers, damaged wood — the odds and ends that add up to about 100 pounds.
Understanding what’s coming down helps you plan what needs covering. A delicate fern needs more protection than a sturdy shrub, and knowing the debris breakdown helps you prioritize.
Foot Traffic and Equipment: The Hidden Threat
Debris gets all the attention, but foot traffic might be the sneakier enemy. Roofing crews move constantly — up ladders, around corners, back to the truck for materials. That’s a lot of boots on the ground, and your soil feels every step.
The University of Minnesota’s Extension Service warns that compacted soil leads to poor plant growth and increased erosion. Roots need air pockets in the soil to breathe and access water. When heavy foot traffic (or equipment) compresses those air pockets, your plants struggle. You might not see the damage immediately, but come next spring, that section of lawn or garden bed could look thin and sad.
Then there’s the equipment factor. Dumpsters, ladders, material staging areas — all of these need to go somewhere on your property. A poorly placed dumpster can crush a section of lawn in a single day. Ladders can gouge bark, snap branches, and leave lasting damage to trees and shrubs.
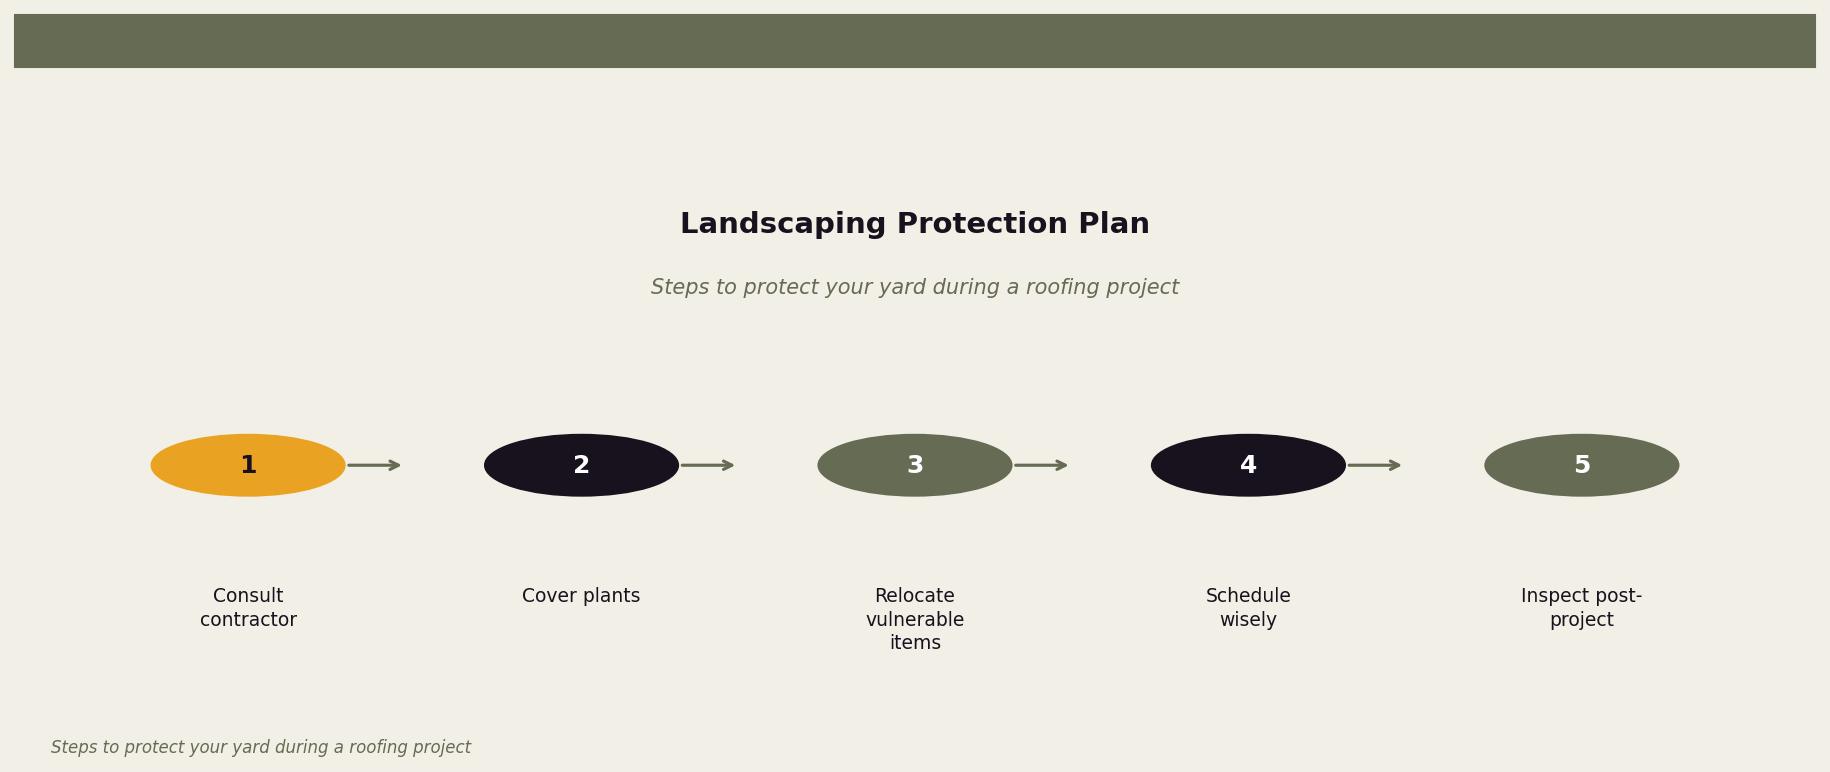
Your Landscaping Protection Plan
You’re the one who built this yard. You know where the fragile plants are, which trees have low branches, and where the soil stays soggy after rain. Use that knowledge to create a protection strategy before the first roofer arrives.
Step 1: Consult With Your Contractor (Before Day One)
Don’t wait until the crew shows up to discuss landscaping concerns. A good roofing company will have a debris management plan, but they’re not mind readers. Walk the property together and point out:
- Delicate plants or garden beds that need covering
- Trees with branches near the roofline
- Areas where you’d prefer they don’t stage materials
- Sprinkler heads, decorative lighting, or other hidden features in the lawn
Ask specific questions: Where will the dumpster go? How do they handle nail cleanup? Do they use tarps or plywood to protect the yard? Some contractors offer landscape protection as part of their service — it’s worth asking, and it’s a sign of a company that thinks beyond just slapping on shingles.
Step 2: Cover Vulnerable Plants and Beds
The NRCA recommends using tarps or plywood sheets to shield plants from falling debris. This is simple, cheap insurance for your landscaping.
Here’s how to do it right:
- Use breathable tarps for plants: Plastic sheeting can overheat and suffocate plants in summer sun. Canvas drop cloths or landscape fabric work better for anything you need to cover for more than a few hours.
- Plywood for high-impact zones: If something’s directly below a steep roof section or near where the crew will toss debris, plywood creates a solid barrier. Prop it at an angle to deflect falling materials away from plant bases.
- Don’t forget the base: Debris slides off tarps and onto whatever’s beside them. Extend your coverage a few feet beyond the plant itself.
- Weight it down: Minnesota wind doesn’t take days off. Secure tarps with landscape staples or weigh down edges with bricks — not rocks that could become projectiles.
Step 3: Relocate What You Can
Some things are easier to move than protect in place. Data from the Census Bureau shows that homeowners who take proactive measures during home improvement projects report higher satisfaction with outcomes — and moving vulnerable items definitely counts as proactive.
Good candidates for temporary relocation:
- Potted plants: Containers are mobile by design. Move them to a garage, covered patio, or the far side of the yard.
- Garden art and decorations: That birdbath, those solar lights, the gnome collection your kids think is embarrassing — bring them inside or store them away from the work zone.
- Patio furniture: Even “protected” furniture can get scratched or dented by falling debris. A few minutes of moving it saves repair headaches.
- Young trees and shrubs: If they’re in containers or recently planted with small root balls, temporary relocation might be less stressful than debris bombardment.
Mark where you moved things from — you’ll thank yourself when it’s time to put everything back.
Step 4: Time Your Project Strategically
You don’t always have control over when your roof gets replaced (storms don’t check your calendar), but if you have flexibility, think about timing.
- After peak growing season: Late summer or early fall means plants are more established and resilient. They’re also past their most vulnerable blooming period.
- Before spring planting: If you’re planning a landscaping refresh anyway, scheduling your roof replacement first means you won’t damage new plantings.
- Avoid extreme heat: Tarped plants in 95-degree weather can cook. If your roofing project lands during a heat wave, check covered plants daily and water if needed.
Step 5: Inspect After the Project
Don’t sign off on the job until you’ve walked your entire yard. Look for:
- Stray nails: Magnetic sweepers should catch most of them, but double-check lawn areas, garden beds, and anywhere near the work zone. One missed nail can mean a flat tire or a trip to the ER.
- Debris in plants: Shake out shrubs and check dense ground cover for trapped shingle pieces.
- Soil compaction: If an area looks flattened, consider aerating it once the crew leaves.
- Branch damage: Inspect trees near the house for broken limbs, scraped bark, or hanging branches that need trimming.
If you find damage, document it with photos and discuss it with your contractor before final payment. A reputable company will make it right.
Special Considerations for Minnesota Homeowners
Our climate adds complications that don’t apply everywhere. The Twin Cities’ freeze-thaw cycles mean our soil behaves differently, and our plants face unique stresses.
The Minnesota Department of Natural Resources emphasizes that healthy soil structure is critical for plants to survive seasonal changes. Compacted soil doesn’t just affect growth during the current season — it makes plants more vulnerable to winter damage and less able to recover in spring.
If your roofing project happens in fall, your plants are heading into dormancy anyway, which actually provides some protection. But spring or summer projects hit plants at their most active, when damage shows immediately and recovery takes longer.
Also consider: a late-season project means your lawn has less time to recover from compaction before freeze-up. You might need to overseed affected areas in fall and plan for additional attention the following spring.
What’s at Stake If You Don’t Prepare
Skipping the prep work feels like saving time, but it usually costs more in the end.
Without protection, you’re looking at potential crushed plants that took years to establish, soil damage that affects growth for seasons to come, nails hiding in your lawn waiting to cause problems, and decreased curb appeal right when your house should look its best with that fresh new roof.
Replacing damaged landscaping isn’t cheap. Mature shrubs cost significantly more than the young versions you originally planted. Reseeding or re-sodding compacted lawn areas adds another bill. And the time you spent building your yard? That’s not something you can buy back.
The good news: prevention is straightforward. A few hours of prep work protects years of investment.
Let Owl Roofing Help You Protect Your Whole Property
At Owl Roofing, we've replaced roofs all across the Twin Cities — and we've seen what can happen when landscaping gets overlooked. As Shoreview locals ourselves, we get it. Your yard matters. We take debris management seriously, communicate clearly about equipment placement, and treat your property like we'd want ours treated. If you've got a roofing project on the horizon and want to talk through protecting your landscaping (or just need an honest assessment of your roof), give us a call at 651-977-6027 or visit owlroofing.com/. We're happy to walk your property and answer questions — no pressure, just neighbors helping neighbors. Protect Your Nest.
📍 Owl Roofing Serves the Entire Twin Cities Metro
Andover · Anoka · Apple Valley · Arden Hills · Big Lake · Blaine · Bloomington · Brooklyn Center · Brooklyn Park · Burnsville · Champlin · Chanhassen · Chaska · Columbia Heights · Coon Rapids · Cottage Grove · Crystal · deephaven · Delano · Eagan · East Bethel · Eden Prairie · Excelsior · Farmington · Forest Lake · Fridley · Golden Valley · Ham Lake · Hastings · Hopkins · Hugo · Inver Grove Heights · Lake Elmo · Lakeville · Lino Lakes · Mahtomedi · Maplewood · Mendota Heights · Minneapolis · Minnetrista · Mound · Mounds View · New Brighton · New Hope · North Oaks · North St. Paul · Oak Grove · Oakdale · Plymouth · Prior Lake · Ramsey · Richfield · Robbinsdale · Rosemount · Roseville · Saint Paul · Savage · Shakopee · Shoreview · South St. Paul · St. Louis Park · St. Michael · St. Paul · Stillwater · Vadnais Heights · Victoria · Waconia · wayzata · West St. Paul · White Bear Lake · woodbury
Licensed Minnesota roofing contractor · Free inspections · 10-year workmanship warranty · Get a free estimate →
