


What to Do After a Storm Roof Damage Checklist
 12min Read
 Posted 11.24.2025
What to Do After a Storm: Roof Damage Checklist
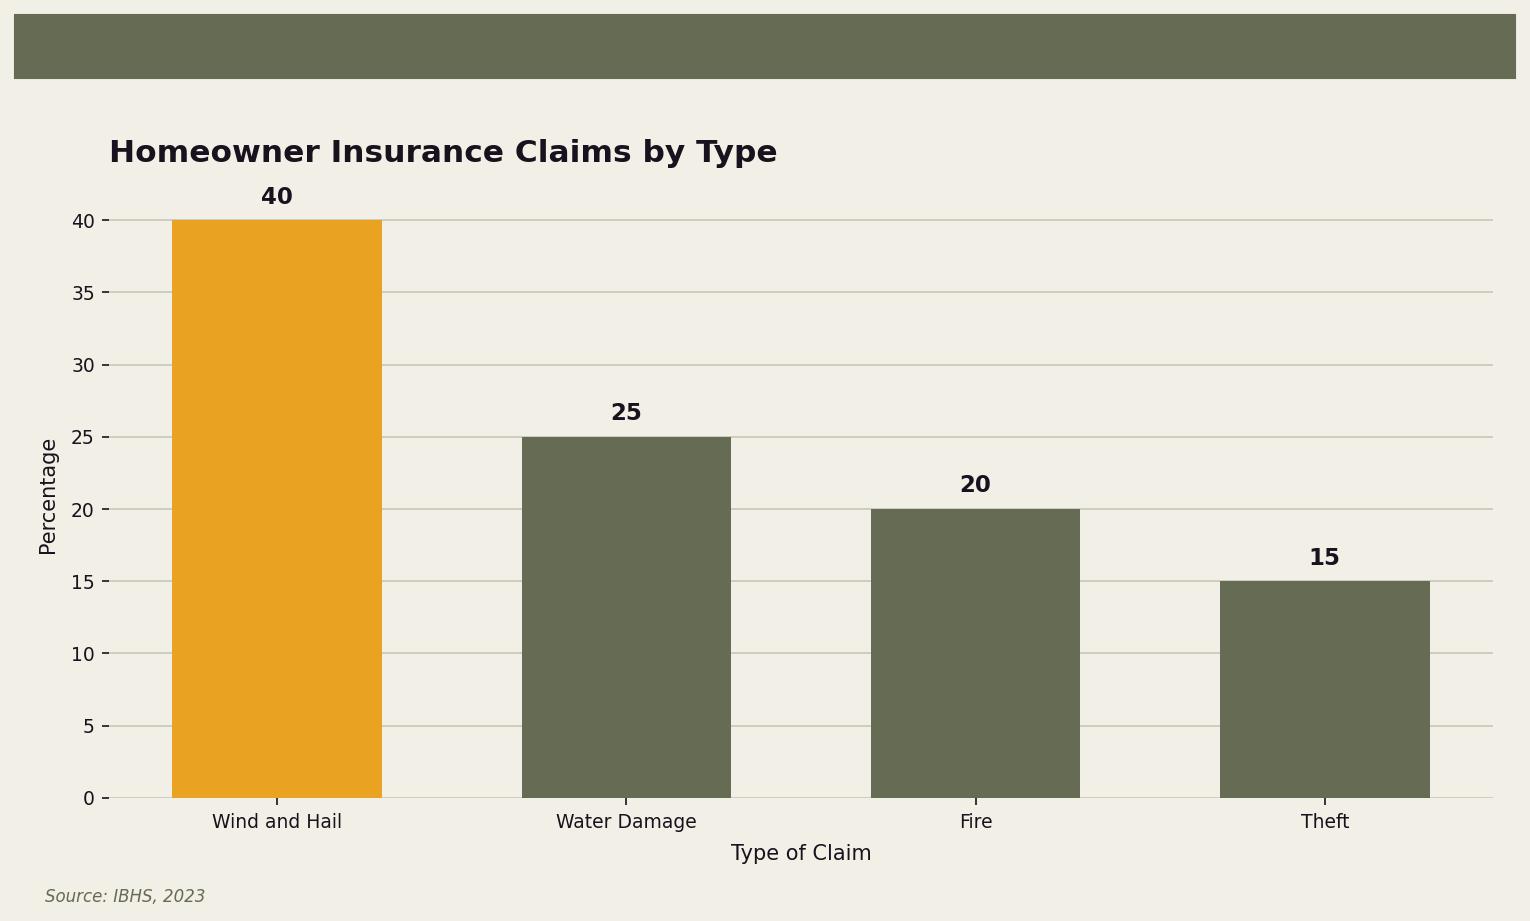
That sinking feeling when you step outside after a nasty storm and see shingles scattered across your lawn like confetti? Yeah, we know it well. Here in the Twin Cities, we get hit with everything—hail the size of golf balls, straight-line winds that snap branches like toothpicks, and those lovely spring storms that roll through at 2 AM. And here’s the kicker: nearly 40% of all homeowner insurance claims are related to wind and hail damage, according to the Insurance Institute for Business & Home Safety (IBHS). Your roof just took a beating, and what you do in the next few hours and days matters more than you might think.
So take a breath. Grab your coffee. Let’s walk through exactly what to do after a storm so you can protect your home, your wallet, and your sanity.
Why This Matters More Than You Think
Look, we get it—roof stuff isn’t exactly exciting. But ignoring storm damage is like ignoring that weird noise your car started making. It’s not going away, and it’s definitely getting worse.
Here’s what’s actually at stake:
- Leaks that sneak up on you. A small crack or lifted shingle lets water in. That water doesn’t announce itself—it quietly soaks into your attic, your insulation, your walls. By the time you notice the water stain on your ceiling, you’ve got a much bigger problem.
- Mold loves Minnesota. Our humidity, combined with hidden moisture from roof damage, creates a perfect breeding ground. Mold remediation isn’t cheap, and it’s definitely not fun.
- Structural damage adds up fast. Water-soaked wood rots. Rotted wood weakens your roof’s structure. See where this is going?
The National Roofing Contractors Association (NRCA) puts it bluntly: storm damage can reduce the lifespan of your roof by as much as 30%. That’s years of protection you’re losing. And Minnesota’s freeze-thaw cycles? They take small problems and turn them into big ones, fast. Water gets into a tiny crack, freezes, expands, and suddenly that tiny crack is a gaping hole.
On the flip side, the National Association of Realtors (NAR) reports that a well-maintained roof can increase your home’s value by up to 10%. So whether you’re planning to stay in your home forever or sell someday, taking care of storm damage is one of the smartest moves you can make.
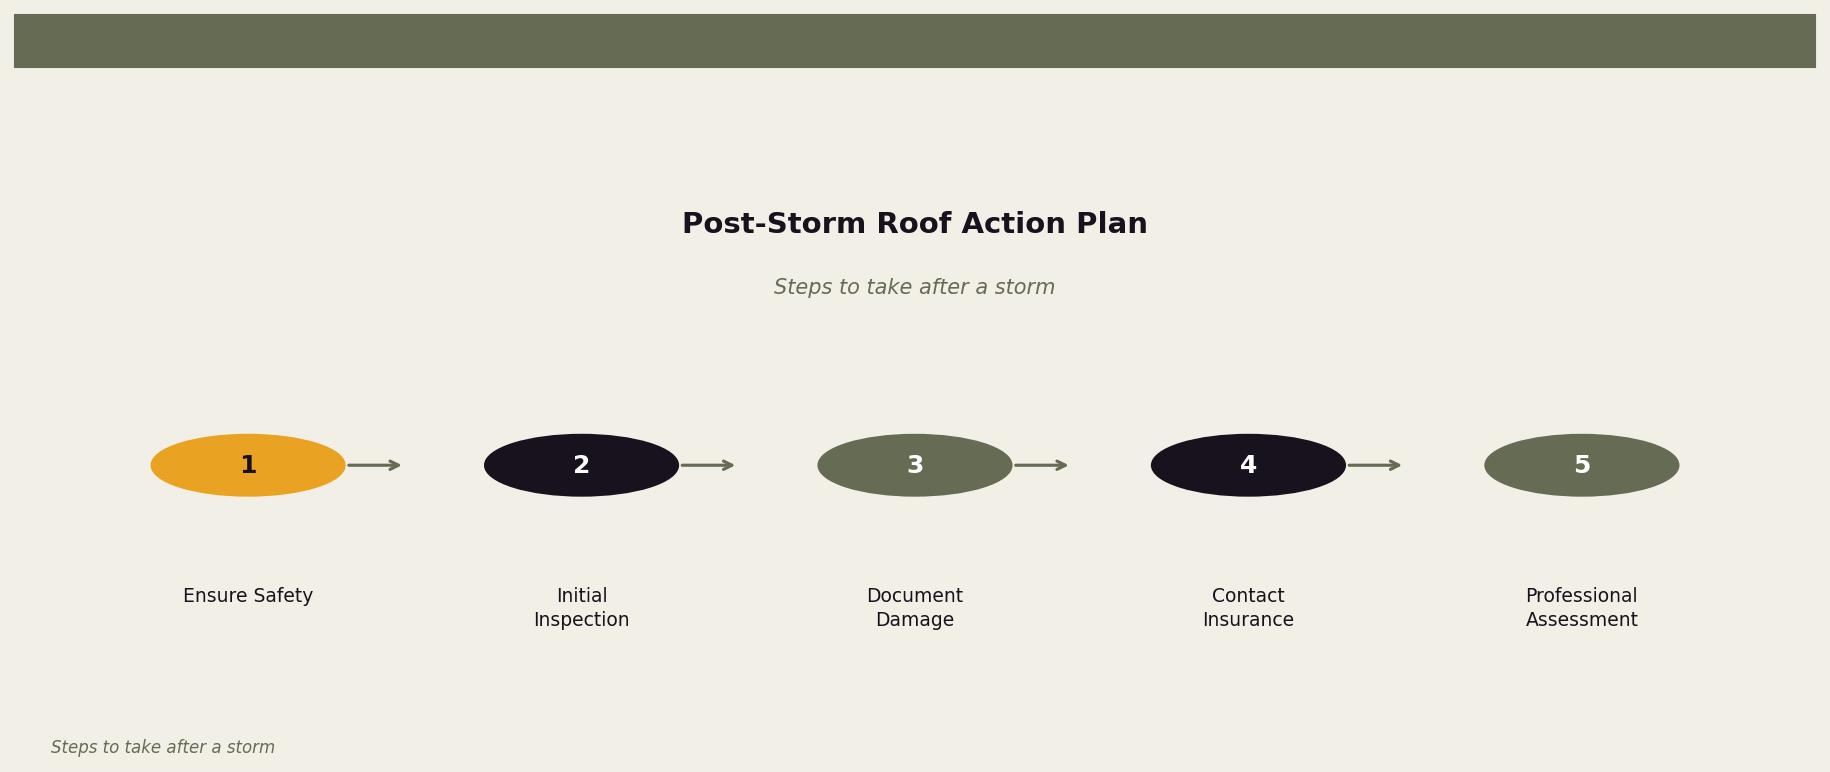
Your Post-Storm Roof Checklist: Step by Step

Step 1: Safety First (Seriously)
We know you’re anxious to check things out. But hold up.
Before you do anything, make sure:
- The storm has completely passed. Minnesota storms love to double back. Check your weather app and wait for the all-clear.
- Power lines are intact. Downed lines can be live even if they’re not sparking. If you see one anywhere near your property, stay far away and call Xcel Energy immediately.
- Trees and branches are stable. That half-broken limb hanging over your driveway? It’s not done falling yet. Give it time or call a tree service.
Once things are safe, resist the urge to climb up on your roof. (We know, we know—you want to see what’s going on up there.) But wet, debris-covered roofs are slippery and dangerous. Start your inspection from the ground with a good pair of binoculars instead.
Step 2: Ground-Level Inspection
Walk around your entire house and look up. You’re scanning for:
- Missing or damaged shingles. Obvious, but important. Look for bare spots, curled edges, or shingles that look like they’ve shifted out of place.
- Shingle granules in your gutters or on the ground. Those little pebble-like bits are your shingles’ protective coating. A bunch of them washing off means your shingles are aging fast—storm damage accelerates this.
- Dented or damaged metal. Check your vents, flashing, and gutters. Hail leaves dimples in metal that are easy to spot.
- Debris on the roof. Branches, leaves, and random storm junk can hide damage or cause new problems if left sitting there.
- Damage to other structures. Check your garage, shed, and fence too. If they got hit, your roof probably did as well.
The IBHS advises that even small issues—like a single missing shingle—can lead to significant water infiltration. Don’t brush off the “minor” stuff.
Step 3: Document Everything
This is the step people skip, and then they regret it when they’re dealing with insurance.
Grab your phone and take photos of:
- Any visible roof damage (zoom in on problem areas)
- Debris in your yard
- Damage to gutters, siding, windows, and outdoor furniture
- The overall state of your property post-storm
Take more photos than you think you need. Different angles, different lighting. Include wide shots that show context and close-ups that show detail. Date-stamp everything if your phone doesn’t do it automatically.
Pro tip: If it’s safe to do so, take a quick video walking around your property and narrating what you see. Insurance adjusters love clear, comprehensive documentation.
Step 4: Check Inside Your Home
Now head inside and look for signs that water has already found its way in:
- Water stains on ceilings or walls. Fresh ones might still look wet. Older ones are usually brown or yellowish rings.
- Dripping or moisture in your attic. If you can safely access your attic, bring a flashlight and look for wet insulation, damp wood, or light coming through where it shouldn’t.
- Peeling paint or bubbling wallpaper. These can indicate moisture behind the walls.
- Musty smells. That “old basement” smell often means moisture is hanging around somewhere.
If you find active leaks, contain the water as best you can—buckets, towels, tarps. Then move to the next step quickly.
Step 5: Contact Your Insurance Company
Don’t wait on this one. Most insurance policies have time limits for reporting storm damage, and the sooner you file, the sooner you can get things moving.
When you call, have ready:
- Your policy number
- The date and approximate time of the storm
- A description of the damage you’ve observed
- Your photos and video documentation
Be honest and thorough, but don’t speculate about damage you haven’t actually seen. Stick to the facts. Your insurance company will send an adjuster to assess the damage—more on that in a minute.
Step 6: Schedule a Professional Roof Inspection
Here’s the thing: you can spot obvious damage from the ground, but storm damage often hides. Hail impact, in particular, can weaken shingles without leaving visible marks from 30 feet away.
The NRCA emphasizes that professional roofers are trained to spot subtle signs of damage that homeowners typically miss. They know where to look, what to look for, and how to assess whether you need a quick repair or a full replacement.
A professional inspection gives you:
- Accurate damage assessment. No guessing games.
- Documentation for your insurance claim. A detailed report from a licensed roofer carries weight with adjusters.
- Repair recommendations. Not just “you need a new roof,” but specific information about what’s wrong and what it’ll take to fix it.
When choosing a roofer for your inspection, look for someone local who knows Minnesota roofs and Minnesota weather. (Storm chasers from out of state will flood the area after big storms—they’re usually gone before you can call them back if something goes wrong.)
Understanding Hail Damage: A Minnesota Specialty
We need to talk about hail specifically because it’s such a common culprit here in the Twin Cities.
Hailstones as small as one inch can cause significant harm, especially to roofs that have some years on them. The Insurance Information Institute (III) reports that the average hail damage claim exceeds $10,000. That’s not a typo—ten thousand dollars.
What does hail damage actually look like? On asphalt shingles, you might see:
- Random dents or bruises. These feel soft or spongy when you press on them (though we don’t recommend walking on your roof to check).
- Exposed fiberglass mat. The dark spots where granules have been knocked off.
- Cracks or fractures. These can be hard to see but compromise the shingle’s integrity.
On metal components (vents, flashing, gutters), hail leaves obvious dents. Check your air conditioning unit and outdoor furniture too—if they’re dented, your roof probably took similar hits.
The tricky part? Hail damage isn’t always immediately obvious, and it can take months for problems to show up as leaks. That’s why a professional inspection after any significant hail storm is worth every penny.
Minnesota-Specific Concerns: Ice Dams and Snow Load
Our climate throws some unique challenges at roofs that homeowners in warmer states never think about.
Ice Dams
The Minnesota Department of Commerce notes that ice dams are a common post-storm issue, especially during our freeze-thaw cycles. Here’s how they form: heat escapes from your attic, melting snow on your roof. That water runs down to your eaves (which are colder because they’re not over heated space), refreezes, and creates a dam. More meltwater backs up behind the dam and seeps under your shingles.
After a storm, make sure your gutters are clear of debris so water can drain properly. And if you notice icicles forming along your roofline, that’s an early warning sign that ice dams might be developing.
Heavy Snow
Minnesota roofs are built to handle snow, but that doesn’t mean they’re invincible. Heavy, wet snow puts serious weight on your roof structure. If you’ve had roof damage from a storm, that structural integrity might be compromised. Watch for:
- Doors that suddenly stick or won’t close properly
- Cracks appearing in walls or ceilings
- Visible sagging in your roofline
These are signs that something’s wrong structurally, and you should call a professional immediately.
Working with Insurance Adjusters
When your insurance adjuster comes out, be present for the inspection. Walk them through the damage you’ve documented and share your photos. If you’ve already had a professional roof inspection, share that report too.
A few tips:
- Don’t sign anything on the spot. Take time to review any documents they give you.
- Ask questions. If something doesn’t make sense, get clarification.
- Get everything in writing. Verbal agreements don’t count.
- Know that you can dispute their assessment. If you believe the damage is worse than they’re claiming, you have options—including getting a second opinion or hiring a public adjuster.
Choosing a Contractor for Repairs
Once you know the extent of the damage and what your insurance will cover, it’s time to get quotes for repairs. The NRCA recommends:
- Get multiple quotes. At least three, so you can compare pricing and scope of work.
- Check credentials. Are they licensed? Insured? Do they have workers’ comp coverage?
- Read reviews. Google, Yelp, Nextdoor—see what your neighbors say about their experience.
- Ask about warranties. What’s covered, and for how long?
- Verify local presence. A local contractor has a reputation to protect and will be around if you need them later.
Be wary of contractors who show up unsolicited right after a storm, offer too-good-to-be-true pricing, or pressure you to sign immediately. Legitimate roofers understand that you need time to make a decision.
Let Owl Roofing Help You Handle It
If you’re reading this after a storm just rolled through the Twin Cities, we’ve been there—both as homeowners and as the folks people call when their roof needs help. At Owl Roofing, we’ve seen every kind of storm damage Minnesota can throw at a roof, from hail-pocked shingles to wind-stripped flashing to ice dam disasters.
We’re a family-owned company based right here in Shoreview—Tim and Bea Brown, Noah and Anya Bergland—with over 15 years of combined roofing experience. No franchise fees. No storm-chaser crews that disappear after cashing your check. Just your neighbors, doing honest work on the homes in our community.
Need a post-storm inspection? Give us a call at 651-977-6027 or visit owlroofing.com/. We’ll look at your roof, tell you exactly what it needs, and help you navigate the insurance process without the headaches.
Protect Your Nest.
📍 Owl Roofing Serves the Entire Twin Cities Metro
Andover · Anoka · Apple Valley · Arden Hills · Big Lake · Blaine · Bloomington · Brooklyn Center · Brooklyn Park · Burnsville · Champlin · Chanhassen · Chaska · Columbia Heights · Coon Rapids · Cottage Grove · Crystal · deephaven · Delano · Eagan · East Bethel · Eden Prairie · Excelsior · Farmington · Forest Lake · Fridley · Golden Valley · Ham Lake · Hastings · Hopkins · Hugo · Inver Grove Heights · Lake Elmo · Lakeville · Lino Lakes · Mahtomedi · Maplewood · Mendota Heights · Minneapolis · Minnetrista · Mound · Mounds View · New Brighton · New Hope · North Oaks · North St. Paul · Oak Grove · Oakdale · Plymouth · Prior Lake · Ramsey · Richfield · Robbinsdale · Rosemount · Roseville · Saint Paul · Savage · Shakopee · Shoreview · South St. Paul · St. Louis Park · St. Michael · St. Paul · Stillwater · Vadnais Heights · Victoria · Waconia · wayzata · West St. Paul · White Bear Lake · woodbury
Licensed Minnesota roofing contractor · Free inspections · 10-year workmanship warranty · Get a free estimate →
