


Roofing Square Explained How to Measure Your Roof
 16min Read
 Posted 10.03.2025
Roofing Square Explained: How to Measure Your Roof
Here’s a number that might surprise you: the average Twin Cities homeowner overspends by $500 to $1,200 on roofing materials simply because they don’t understand how their roof is measured. That’s money that could go toward a new grill, a weekend at the cabin, or just staying in your pocket where it belongs.
If you’ve ever gotten a roofing estimate and wondered what the heck a “roofing square” is—or why your contractor keeps talking about your roof like it’s a geometry problem—you’re in the right place. This isn’t complicated stuff, but it’s stuff you need to know. Because when you understand how roofing measurements work, you can spot a fair estimate, avoid getting overcharged, and actually have an intelligent conversation with your contractor instead of just nodding along and hoping for the best.
You’re the one protecting your home. You’re the one making the decisions. Let’s make sure you have the information you need to make good ones.
Why This Matters to You (More Than You Think)
Here’s the thing about roofing projects: they’re not cheap. The average roof replacement in Minnesota runs between $8,000 and $25,000 depending on your home’s size and the materials you choose. With that kind of money on the line, understanding how your roof is measured isn’t just nice to know—it’s essential.
A roofing square is the industry’s standard unit of measurement, and it equals exactly 100 square feet. That’s it. Nothing fancy. A 10×10 foot area equals one roofing square. Your entire roof gets broken down into these 100-square-foot chunks, and that’s how contractors calculate materials, labor, and your final bill.
According to the National Roofing Contractors Association (NRCA), accurately measuring your roof can save you from unnecessary expenses and ensure you buy the right amount of materials. This isn’t just about convenience—it’s about real money. Inaccurate measurements lead to two equally frustrating scenarios:
- Too much material: You’ve paid for shingles that are now sitting in your garage, probably forever. Those extra bundles aren’t worth much as garage decorations.
- Not enough material: Your project grinds to a halt while everyone waits for a special order. Meanwhile, your half-finished roof is exposed to whatever Minnesota decides to throw at it that week—and trust us, Minnesota always has something to throw.
Neither option is good. Both cost you money, time, and peace of mind. Understanding roofing squares puts you in control of the process instead of leaving you at the mercy of whoever shows up with a clipboard.
The Basics: What Exactly Is a Roofing Square?
Breaking Down the Math (Don’t Worry, It’s Easy)
Let’s get specific because vague explanations don’t help anyone. A roofing square is a 10×10 foot area, which equals 100 square feet. That’s the entire concept. If your roof measures 2,000 square feet total, you have 20 roofing squares. If it’s 1,500 square feet, you have 15 roofing squares.
Why does the industry use this measurement instead of just square feet? Mostly because it makes the math cleaner when ordering materials. Shingles, for example, are sold in bundles, and it typically takes three bundles to cover one roofing square (though this can vary slightly depending on the shingle type). So if you have a 20-square roof, you’ll need approximately 60 bundles of shingles.
Here’s a quick reference for common Twin Cities home sizes:
- Small rambler (1,200 sq ft roof): 12 roofing squares
- Average two-story (1,800 sq ft roof): 18 roofing squares
- Larger colonial (2,500 sq ft roof): 25 roofing squares
- Big split-level with additions (3,000+ sq ft roof): 30+ roofing squares
Keep in mind that your roof’s square footage isn’t the same as your home’s square footage. Your roof extends beyond your walls (those overhangs that keep rain from running down your siding), and it’s sloped, which adds surface area. A 1,500 square foot home might easily have an 1,800 or 2,000 square foot roof.
Why Accurate Measurements Save You Real Money
According to a report by the Insurance Institute for Business & Home Safety (IBHS), homeowners who accurately measure their roofs before starting a project tend to save around 10% on material costs. On a $15,000 roofing project, that’s $1,500 back in your pocket.
This statistic isn’t just a nice number—it represents the difference between getting exactly what you need and getting taken for a ride. Some less-than-honest contractors inflate square footage to pad their bills. Others genuinely make mistakes. Either way, if you don’t know your numbers, you can’t catch the error.
Accurate measurements are particularly critical here in the Twin Cities, where our weather doesn’t mess around. If your project gets delayed because someone ordered the wrong amount of materials, that delay might coincide with a surprise April snowstorm, a week of rain in June, or an early October freeze. Your exposed roof doesn’t care about supply chain issues—it just lets water in.
How to Actually Measure Your Roof
The Ground-Level Method (Safer and Usually Good Enough)
You don’t necessarily need to climb on your roof to get a decent measurement. Here’s how to estimate from the ground:
Step 1: Measure your home’s footprint. Walk around your house with a tape measure and note the length and width. Don’t forget attached garages, additions, or any covered porches that have roofing over them.
Step 2: Account for overhangs. Your roof extends past your walls—usually by 6 inches to 2 feet on each side. Add this overhang measurement to each dimension. If your house measures 40 feet by 30 feet and you have 1-foot overhangs all around, your actual roof footprint is closer to 42 feet by 32 feet.
Step 3: Factor in the pitch. This is where it gets a little tricky. Roof pitch (how steep your roof is) adds surface area. A perfectly flat roof would equal your footprint measurement exactly, but flat roofs are rare in Minnesota for good reason—they don’t shed snow well.
Here’s a rough multiplier based on common roof pitches:
- Low pitch (3/12 to 4/12): Multiply footprint by 1.05 to 1.08
- Medium pitch (5/12 to 7/12): Multiply footprint by 1.10 to 1.20
- Steep pitch (8/12 to 12/12): Multiply footprint by 1.25 to 1.45
Most Twin Cities homes fall in the medium-pitch range. So if your roof footprint is 1,344 square feet (42×32), and you have a 6/12 pitch, multiply by about 1.12 to get approximately 1,505 square feet—or roughly 15 roofing squares.
The On-Roof Method (More Accurate, Less Safe)
If you’re comfortable on a roof and have proper safety equipment, measuring directly gives you the most accurate numbers. Here’s the process:
Step 1: Gather your tools. You’ll need a tape measure (at least 25 feet), a notepad and pen, a helper on the ground, and most importantly—a safety harness and proper footwear. Minnesota roofs get slippery, even when they look dry.
Step 2: Break your roof into sections. Most roofs aren’t simple rectangles. You might have dormers, valleys, different levels, or hip sections. Sketch out your roof and identify each distinct rectangular or triangular section.
Step 3: Measure each section. For rectangular sections, measure length times width. For triangles (common in hip roofs and dormers), measure base times height and divide by two.
Step 4: Add everything up. Total all your section measurements to get your complete roof square footage. Then divide by 100 to convert to roofing squares.
A word of caution: if your roof is steep (you feel uncomfortable standing on it), has multiple levels, or if you don’t have proper safety gear—just don’t. The measurements aren’t worth a trip to the emergency room. Get a professional to do it.
The Modern Method (Technology to the Rescue)
Here’s something many homeowners don’t know: satellite imagery has gotten so good that professional roofers can often measure your roof without ever climbing on it. Services like EagleView and Google Earth Pro can generate surprisingly accurate roof measurements.
Many reputable roofing contractors use these tools to provide initial estimates. It’s fast, it’s accurate within a few percentage points, and it means less time spent on your roof during the quote phase. If a contractor shows up with satellite measurements and they’re willing to verify on-site before finalizing, that’s generally a good sign they know what they’re doing.
Roof Types and Why They Complicate Everything

Simple Gable Roofs
If you have a basic gable roof (the kind that looks like an upside-down V from the front), you’re in luck. These are the easiest to measure. Two rectangular planes, maybe a few overhangs, done. Most ramblers and basic two-stories in areas like Roseville, Fridley, and older parts of Shoreview have simple gable roofs.
Hip Roofs
Hip roofs slope down on all four sides instead of just two. They’re more common on split-levels and colonial-style homes throughout Maple Grove, Plymouth, and Woodbury. These roofs have triangular sections at the ends and trapezoidal sections on the sides, which makes the math more involved. They also typically require more material because of waste from cutting shingles to fit the angles.
Roofs with Dormers and Additions
Dormers (those windowed structures that pop out of sloped roofs) add complexity—and square footage—that’s easy to underestimate. Each dormer has its own mini-roof, its own flashing requirements, and its own potential leak points. If your home has been added onto over the years, the roof geometry can get genuinely complicated.
Many older Twin Cities homes have been through multiple additions as families grew. That charming 1960s rambler in Richfield might have a family room addition from the 80s, a sunroom from the 90s, and a master suite bump-out from 2005. Each addition potentially means different roof lines, different materials, and different wear patterns.
Mansard and Gambrel Roofs
These architectural styles (mansard roofs have four steep sides; gambrel roofs are the “barn style” with two different slopes) are less common but definitely present in the Twin Cities, particularly in areas with Victorian-era homes or certain mid-century developments. They require significantly more roofing material than their footprint suggests and often need specialized installation techniques.
Minnesota Weather: Why It Matters for Your Roof
Let’s talk about why accurate roofing measurements matter even more here in Minnesota than in, say, Arizona.
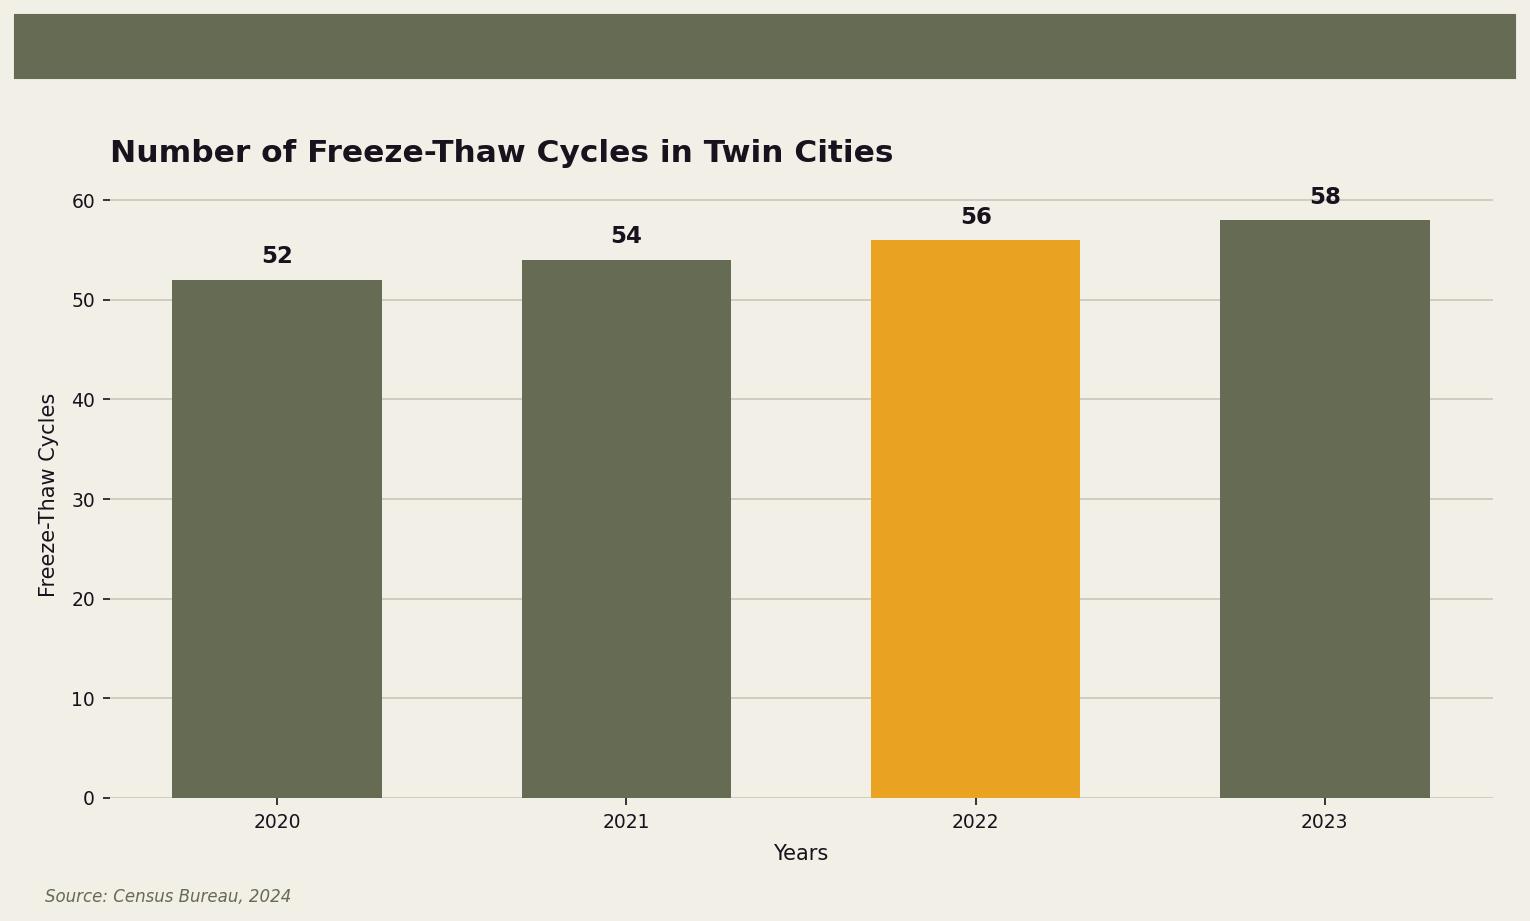
According to data from the Census Bureau, the Twin Cities experience an average of 56 freeze-thaw cycles per year. That means 56 times annually, water seeps into tiny cracks and crevices, freezes, expands, and pries things apart. Then it thaws. Then it freezes again. This relentless cycle is brutal on roofing materials.
What does this mean for measurements? It means you need to account for proper underlayment—especially ice and water shield in valleys and along eaves. It means you might need slightly more material to properly overlap shingles for wind resistance. It means the margin for error is smaller because a poorly installed roof fails faster here than it would in a gentler climate.
When you’re calculating roofing squares, remember that material estimates should include:
- 10-15% waste factor: For cuts, damaged pieces, and proper overlapping
- Starter strips and ridge caps: These don’t come out of your regular shingle count
- Ice and water shield: Required along eaves and in valleys in Minnesota
- Underlayment for the entire roof: Synthetic underlayment is worth the upgrade here
A contractor who just multiplies your squares by three bundles and calls it good isn’t accounting for Minnesota reality. You want someone who understands that a 20-square roof here needs different prep than a 20-square roof in San Diego.
Mistakes That Cost Twin Cities Homeowners Money
Mistake #1: Measuring the House, Not the Roof
We touched on this earlier, but it’s worth emphasizing. Your roof is bigger than your house footprint. The overhangs add square footage. The pitch adds square footage. Dormers add square footage. If you give a contractor your house’s square footage instead of your roof’s square footage, you’ll get an inaccurate estimate—and not in your favor.
Mistake #2: Forgetting About Pitch
A steep roof has significantly more surface area than a low-slope roof over the same footprint. Ignoring pitch can throw off your calculations by 20% or more. That’s a big deal when you’re buying materials.
Mistake #3: Assuming All Materials Cover the Same Area
Different roofing materials have different coverage rates. Standard three-tab shingles, architectural shingles, cedar shakes, and metal panels all calculate differently. Three bundles of standard shingles cover one square, but premium architectural shingles might require four bundles for the same coverage. Always verify coverage rates for your specific materials.
Mistake #4: Thinking Professional Measurements Are a Waste
Some homeowners try to save money by doing all their own measuring and then shopping contractors for the best price per square. Here’s the problem: if your measurements are wrong, you’re comparing apples to oranges. One contractor might be bidding on what your roof actually is, while another is bidding on your incorrect numbers.
The National Association of Realtors (NAR) notes that professional measurements are typically more accurate and can prevent costly mistakes. Getting a professional measurement—especially for complex roofs—often pays for itself by ensuring everyone’s working from the same accurate numbers.
Mistake #5: Not Getting Multiple Estimates
Even armed with your own measurements, you should get at least three estimates for any significant roofing work. If one estimate comes back wildly different from the others, ask questions. Either they measured differently, they’re using different materials, or something else is going on that deserves explanation.
Your Action Plan: Measuring Your Roof Step by Step
Ready to figure out your roof’s size? Here’s your game plan:
- Gather your tools: tape measure (25-foot minimum), notepad, pen, calculator, and a helper if possible.
- Sketch your roof: Draw a rough overhead view of your home, breaking the roof into simple rectangles and triangles.
- Measure the footprint: Walk the perimeter of your home and note the dimensions. Add overhang measurements (typically 1-2 feet per side).
- Determine your pitch: If you can safely access your attic, measure 12 inches horizontally from a rafter and see how many inches it rises. That ratio (rise over 12) is your pitch.
- Calculate each section: Multiply length times width for rectangles. For triangles, use (base × height) ÷ 2.
- Apply the pitch multiplier: Use the chart above to adjust for your roof’s slope.
- Add it all up: Total your adjusted section measurements for complete roof square footage.
- Convert to roofing squares: Divide total square footage by 100.
- When in doubt, call a pro: For complex roofs or if you’re uncomfortable with the process, a professional measurement is worth every penny.
Ready to Take the Next Step?
Here’s the truth: understanding roofing squares gives you power. It means you can look at an estimate and know whether the numbers make sense. It means you can ask informed questions. It means you’re not just hoping your contractor is honest—you can verify it yourself.
But knowing your measurements is just the first step. Eventually, you need someone you trust to actually do the work. And that’s where having the right guide matters.
At Owl Roofing, we’ve measured hundreds of Twin Cities roofs—everything from simple Shoreview ramblers to complicated Eagan homes with three additions and dormers everywhere. We know what Minnesota weather does to roofs, and we’ve seen what happens when measurements are rushed or estimates are padded. That’s not how we operate. We look at your roof, tell you exactly what it needs, and get it done right. No games, no surprises, no chasing us down for answers.
Tim and Bea, Noah and Anya—we’re your neighbors. We live here, we raise our families here, and we’re going to be here next year and the year after when you need us. We’re not a franchise hitting town after a hailstorm, and we’re not a faceless corporation routing calls through a call center. We’re a family-owned company with 15+ years of combined experience, and we treat your home the way we’d want someone to treat ours.
If you’ve got questions about your roof’s measurements, want a straightforward estimate, or just need someone to take a look and tell you honestly what’s going on up there—give us a call at 651-977-6027 or visit us at owlroofing.com/. We serve all of the Twin Cities, and we’d love to help you figure out your next steps.
Protect Your Nest.
📍 Owl Roofing Serves the Entire Twin Cities Metro
Andover · Anoka · Apple Valley · Arden Hills · Big Lake · Blaine · Bloomington · Brooklyn Center · Brooklyn Park · Burnsville · Champlin · Chanhassen · Chaska · Columbia Heights · Coon Rapids · Cottage Grove · Crystal · deephaven · Delano · Eagan · East Bethel · Eden Prairie · Excelsior · Farmington · Forest Lake · Fridley · Golden Valley · Ham Lake · Hastings · Hopkins · Hugo · Inver Grove Heights · Lake Elmo · Lakeville · Lino Lakes · Mahtomedi · Maplewood · Mendota Heights · Minneapolis · Minnetrista · Mound · Mounds View · New Brighton · New Hope · North Oaks · North St. Paul · Oak Grove · Oakdale · Plymouth · Prior Lake · Ramsey · Richfield · Robbinsdale · Rosemount · Roseville · Saint Paul · Savage · Shakopee · Shoreview · South St. Paul · St. Louis Park · St. Michael · St. Paul · Stillwater · Vadnais Heights · Victoria · Waconia · wayzata · West St. Paul · White Bear Lake · woodbury
Licensed Minnesota roofing contractor · Free inspections · 10-year workmanship warranty · Get a free estimate →
