


Roof Flashing Explained Where It Goes and Why It Leaks
 20min Read
 Posted 10.02.2025
Roof Flashing Explained: Where It Goes and Why It Leaks
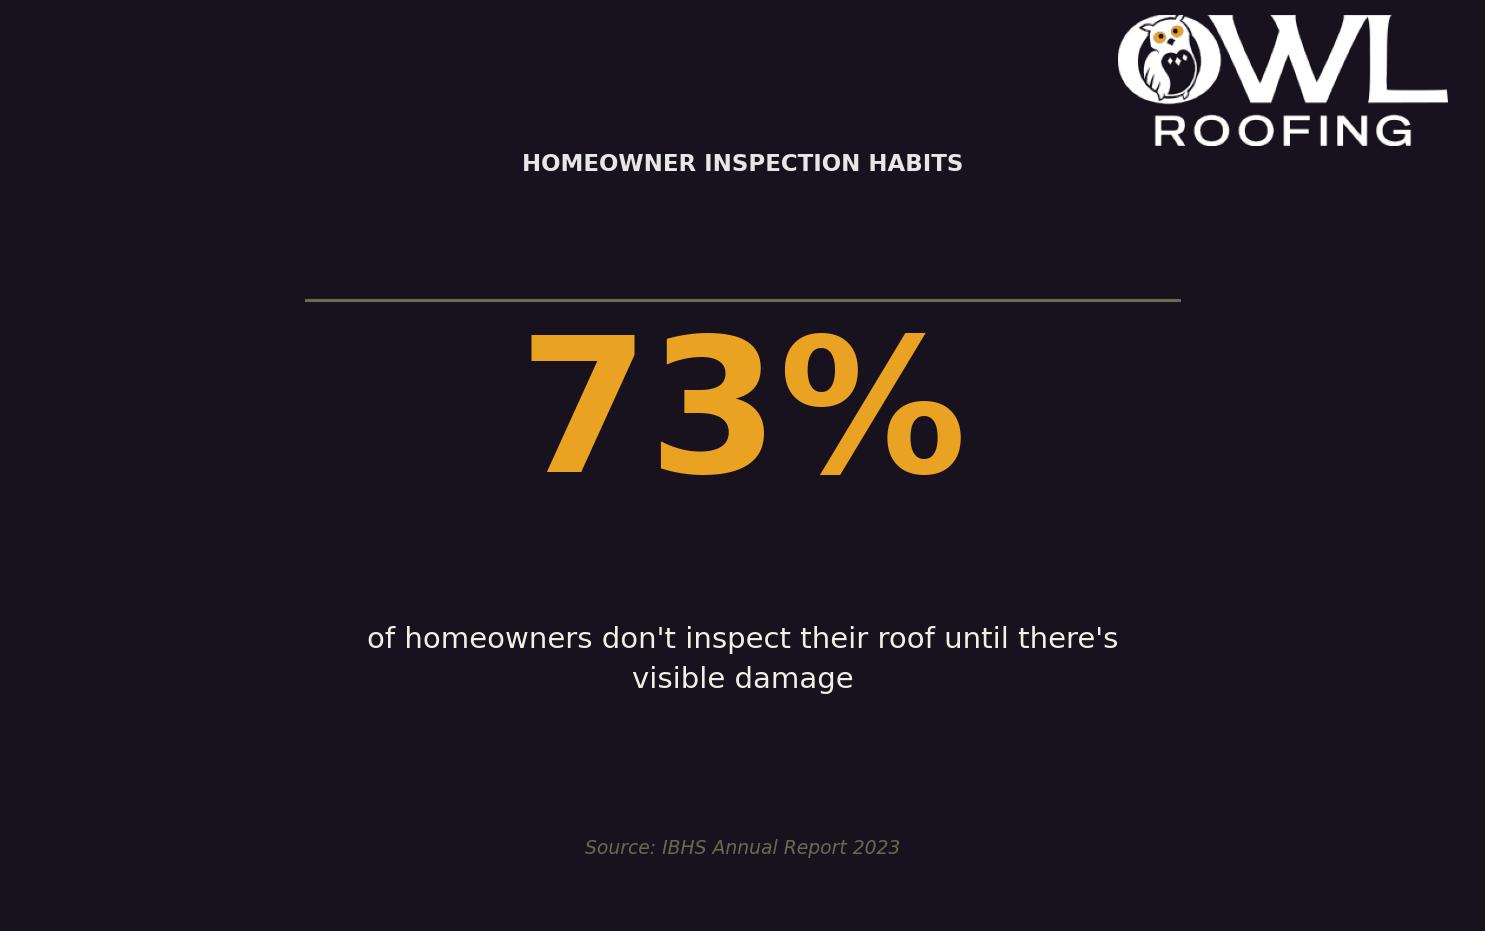
That dark spot on your ceiling? It’s probably not your roof shingles. In fact, most Twin Cities homeowners who call about a “roof leak” are actually dealing with a flashing failure—and they’ve never even heard the word before. Here’s the kicker: 73% of homeowners don’t inspect their roof until there’s visible damage, according to the IBHS Annual Report 2023. By then, that small flashing gap has already let gallons of water into your attic, walls, and insulation.
If you’ve ever stood in your living room in Maple Grove, Roseville, or right here in Shoreview watching a water stain slowly spread across your ceiling during a spring thunderstorm, you know that sinking feeling. Your roof looks fine from the street. The shingles are intact. So what’s going on up there? The answer is almost always hiding in plain sight: thin strips of metal called roof flashing that are supposed to seal the gaps where your roof meets walls, chimneys, vents, and skylights. When flashing works, you never think about it. When it fails, you think about it a lot—usually while holding a bucket.
This guide breaks down everything you need to know about roof flashing: what it actually is, where it goes on your roof, why it leaks (especially in Minnesota), and exactly what you can do about it. No roofing jargon, no scare tactics—just straight talk from people who climb on roofs for a living and have seen every type of flashing failure the Twin Cities weather can dish out.
Why This Matters to Your Wallet and Your Home
Let’s talk numbers, because this is where it gets real. The National Association of Realtors (NAR) reports that water damage is the second most common home insurance claim, with an average payout of $10,234. That’s not a typo—over ten thousand dollars, on average, to fix water damage that often starts with a failed piece of flashing that costs maybe $50 to repair when caught early.
In Minnesota, we’ve got a perfect storm of conditions that stress roof flashing to its breaking point. Our summers bring heavy rain and humidity. Our winters deliver snow loads, ice, and temperatures that can swing 50 degrees in a single week. That freeze-thaw cycle—where ice melts, water seeps into tiny gaps, then freezes and expands—is brutal on metal flashing and the sealants that hold it in place. A flashing installation that might last 30 years in Arizona could start failing in 10 to 15 years here in the Twin Cities.
The National Roofing Contractors Association (NRCA) lists improper flashing installation as one of the top reasons for roof leaks nationwide. But here’s what they don’t always mention: even properly installed flashing needs attention over time, especially in climates like ours. The caulk dries out. The metal expands and contracts. The mortar around your chimney cracks. These aren’t signs of a bad roof—they’re just what happens when Minnesota weather meets physics.
The good news? Flashing problems are almost always fixable, and catching them early can save you thousands. The bad news? Most homeowners don’t know what flashing is, where to look for it, or what warning signs to watch for. That’s exactly what we’re going to fix right now.
Understanding Roof Flashing: The Basics
What Is Roof Flashing, Exactly?
Roof flashing is thin metal—usually galvanized steel, aluminum, or copper—installed at transition points on your roof where water is most likely to find a way inside. Think of it as the weatherstripping of your roof. Shingles do a great job protecting flat, open areas, but every time your roof changes direction, meets a wall, wraps around a chimney, or gets interrupted by a vent pipe, there’s a potential entry point for water. Flashing seals those gaps.
The concept is simple: water flows downhill, so flashing is installed to overlap in a way that directs water away from seams and onto the shingles, where it can continue its journey to your gutters. When flashing is installed correctly and maintained properly, it creates a continuous water-shedding surface. When it’s not—or when it deteriorates over time—you get leaks.
Here in the Twin Cities, we see a lot of older homes with original flashing that’s been up there since the Reagan administration. That galvanized steel has been through 30+ Minnesota winters, and it shows. We also see newer homes where the flashing was installed quickly by crews more focused on speed than quality. Both situations create the same result: water finding its way where it doesn’t belong.
Types of Roof Flashing and Where They Go
There are several types of roof flashing, each designed for a specific location and purpose on your roof. Understanding these can help you know what to look for during your own visual inspections:
- Step Flashing: This is the most common type you’ll find on Minnesota homes. Step flashing is used wherever your roof meets a vertical wall—like where a second story rises above a lower roof section, or where a dormer sticks out from your main roof. It’s called “step” flashing because it’s installed in overlapping pieces that follow the stair-step pattern of your shingles as they go up the roof. Each piece tucks under the siding above and overlaps the shingle below, creating a shingle-like barrier against water. When step flashing fails, you’ll often see water stains on interior walls adjacent to where the roof meets an exterior wall.
- Valley Flashing: Roof valleys—those V-shaped channels where two roof slopes meet—are high-traffic areas for water runoff. During a heavy Minnesota thunderstorm, valleys can channel hundreds of gallons of water in minutes. Valley flashing runs underneath the shingles on both sides of the valley, creating a continuous metal channel that directs all that water safely down to your gutters. Some valleys use “open” flashing where the metal is visible, while others use “closed” or “woven” valleys where shingles cover the flashing. Both can work well, but both can also fail if not installed properly or if debris accumulates and causes water to back up.
- Drip Edge Flashing: Drip edge runs along the edges of your roof—both at the eaves (the horizontal edges) and the rakes (the sloped edges on the gable ends). Its job is to direct water into your gutters rather than letting it run down the fascia board and potentially behind your gutters. In Minnesota, proper drip edge installation is also important for preventing ice dams from forcing water under your shingles at the roof’s edge. Missing or improperly installed drip edge is something we see constantly on Twin Cities homes, and it’s often the hidden cause of fascia rot and soffit damage.
- Counter Flashing and Base Flashing (Chimney Flashing): Chimneys are leak magnets. They’re big, they stick up through your roof, and they create four separate seams where water can enter. Chimney flashing is actually a two-part system: base flashing (also called apron flashing on the downslope side) attaches to the roof and runs up the chimney wall, while counter flashing is embedded into the chimney mortar and folds down over the base flashing. This overlap creates a waterproof seal—when it’s done right. When the mortar cracks, the counter flashing pulls away, or the sealant fails, chimneys become the number one source of roof leaks in older homes.
- Vent Pipe Flashing (Pipe Boots): Every plumbing vent that exits through your roof needs a boot—a cone-shaped piece of flashing with a rubber or neoprene gasket that seals around the pipe. These boots are inexpensive but incredibly important. The rubber gasket is the weak point; it dries out and cracks after years of sun and temperature extremes. A cracked pipe boot is one of the easiest leaks to fix, but also one of the most common we see on Twin Cities roofs.
- Skylight Flashing: Skylights are wonderful for bringing natural light into your home, but they’re essentially holes in your roof that require careful flashing around all four sides. Most skylights come with integrated flashing kits, but improper installation or sealant failure can turn that beautiful skylight into a drip source. If you have skylights and notice water stains around them, the flashing should be your first suspect.
Each type of flashing tackles a specific challenge, and they all need to work together as a system. One weak link—a cracked pipe boot, a lifted piece of step flashing, a gap in your chimney counter flashing—can let water into your home even if everything else is perfect.
Why Roof Flashing Leaks: The Real Causes
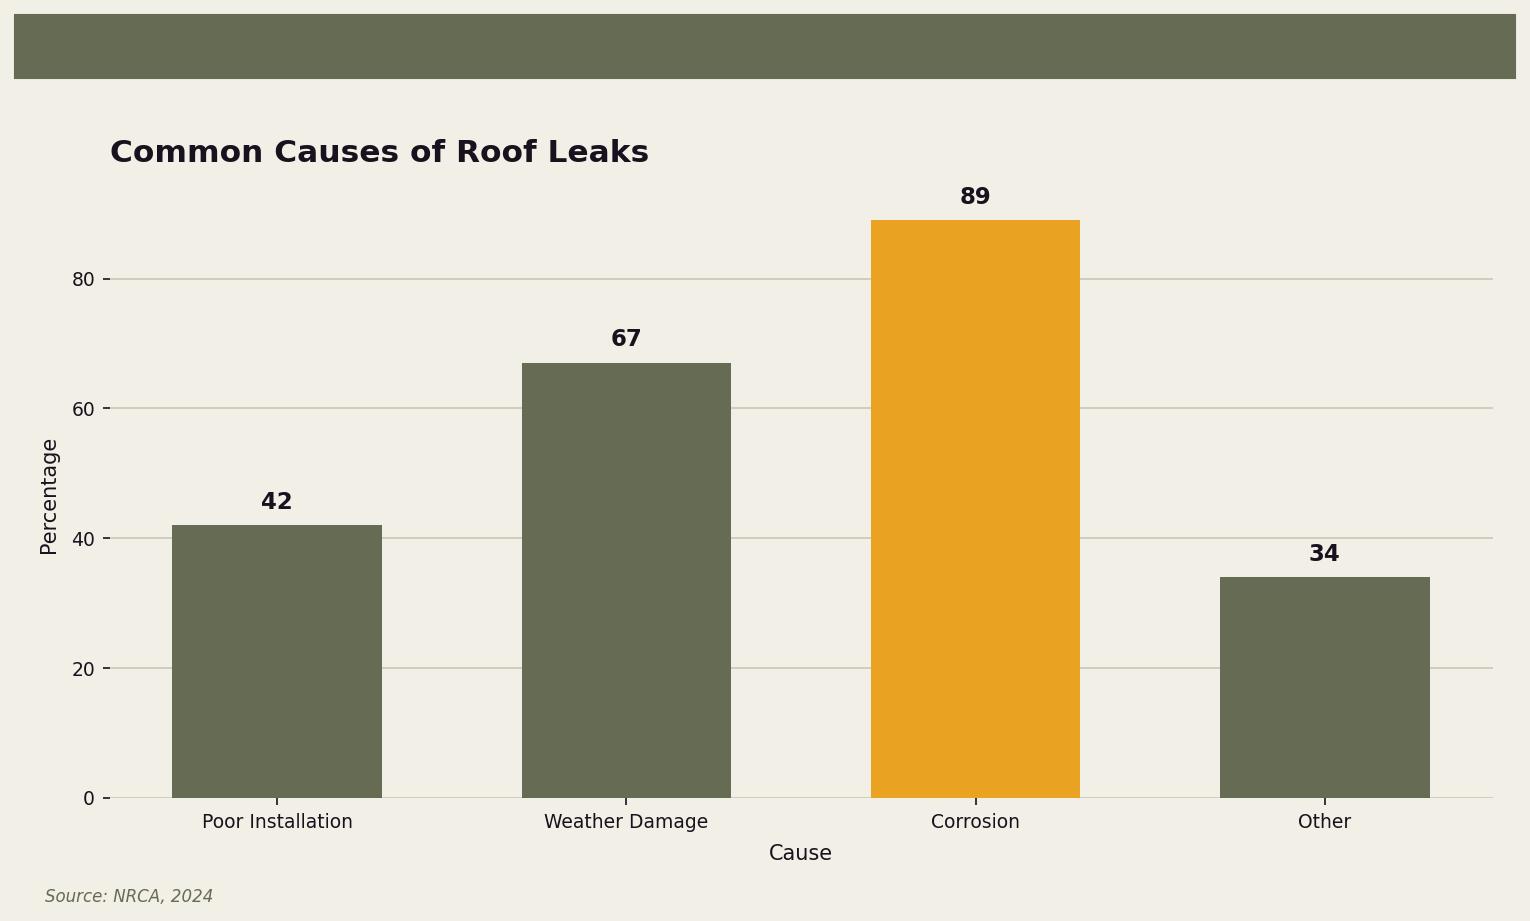
Common Causes of Flashing Failure
Flashing doesn’t just randomly start leaking. There’s always a cause, and understanding these causes can help you prevent problems or catch them early:
- Poor Installation: This is the big one. According to roofing industry data, improper installation accounts for a huge percentage of flashing failures. We’re talking about flashing that wasn’t overlapped correctly, wasn’t sealed properly, or used the wrong materials for the application. Some installers skip steps to save time. Others simply don’t have the training to handle complex flashing details around chimneys or dormers. This is why who installs your roof matters as much as what materials they use. A skilled crew takes extra time on flashing because they know it’s where leaks start.
- Weather Damage and Temperature Cycling: Minnesota weather is tough on everything, and flashing is no exception. Heavy snow loads can push flashing out of position. Ice can work its way under flashing edges. Wind can lift and bend flashing. But the real killer is the freeze-thaw cycle. Metal expands when it’s warm and contracts when it’s cold. Over years of temperature swings—sometimes 60 or 70 degrees in a single week during our spring and fall seasons—flashing can work itself loose from the sealant and fasteners holding it in place. Small gaps open up. Water gets in. The cycle accelerates.
- Corrosion and Rust: Galvanized steel flashing—the most common type—has a zinc coating that protects against rust. But that coating wears away over time, especially at cut edges and in areas where debris accumulates and holds moisture against the metal. Once rust starts, it spreads. Eventually, you get holes or weakened areas where water can penetrate. Aluminum flashing doesn’t rust but can corrode when in contact with certain materials. Copper is the most durable option and actually develops a protective patina over time, but it costs significantly more.
- Sealant Failure: Here’s a dirty secret of the roofing industry: a lot of flashing “installation” is really just caulk holding things together. And caulk doesn’t last forever. Even high-quality roofing sealants dry out, crack, and shrink over 5-10 years. When the sealant fails, water finds the gaps. This is especially common around chimneys, where counter flashing is often sealed into mortar joints with caulk that gets cooked by the sun and frozen by winter temperatures.
- Debris Accumulation: Leaves, pine needles, twigs, and other debris can pile up in roof valleys and around chimneys. This debris holds moisture against the flashing, accelerating corrosion. It can also create dams that cause water to back up and flow under flashing rather than over it. Keeping your roof clear of debris—especially in valleys and near chimneys—is one of the simplest things you can do to protect your flashing.
- Settling and Movement: Houses move. Foundations settle slightly. Framing lumber expands and contracts with humidity changes. Over decades, these small movements can stress flashing connections, particularly around chimneys (which have their own separate foundation and can move independently from your house). A gap that wasn’t there when your home was built might open up after 20 years of settling.
How to Spot Flashing Problems
You don’t need to climb on your roof to catch most flashing problems early. Here’s what to watch for:
- Interior water stains: Stains on ceilings or walls, especially near chimneys, skylights, or where roof meets wall
- Damp or musty smells in the attic: Water intrusion you can’t see might show up as moisture or odor in your attic space
- Visible rust or corrosion: Binoculars from the ground can often reveal rusted flashing
- Lifted or bent flashing: Flashing that’s pulling away from surfaces or looks warped
- Missing caulk or sealant: Gaps where you can see daylight or missing sealant around chimney flashing
- Granules in gutters near flashing: Accelerated shingle wear near flashing can indicate water flow problems
Minnesota and Twin Cities: Special Considerations

Living in the Twin Cities means your roof faces challenges that homeowners in milder climates simply don’t deal with. The Insurance Institute for Business & Home Safety (IBHS) specifically notes that homes in cold climates like Minnesota are more prone to ice dams, which have a direct and destructive relationship with roof flashing.
Here’s how ice dams work: Heat escaping from your home warms the roof deck, melting snow from underneath. That meltwater runs down toward the eaves, which are colder because they extend past your heated living space. The water refreezes at the eaves, forming a dam of ice. As more water flows down and hits that dam, it pools on your roof. That pooled water can work its way under shingles and—you guessed it—under and around flashing. Flashing that’s perfectly watertight under normal rain conditions can fail when water is sitting against it or being pushed uphill by ice pressure.
This is why flashing installation in Minnesota needs to account for more than just rain. Proper underlayment (ice and water shield) should extend well beyond the eaves and around all flashing penetrations. Flashing seams need to be especially tight because they might face water pressure from unusual directions during ice dam conditions. And materials need to handle extreme temperature ranges—from 95°F summer days to -25°F winter nights.
Minnesota building codes recognize these challenges and include specific requirements for roofing in our climate zone. However, codes represent the minimum acceptable standard, not best practices. A roof that just barely meets code might develop flashing problems sooner than one that’s built to exceed code requirements.
Another Twin Cities consideration: many of our homes were built in the 1950s, 60s, and 70s, when flashing standards and materials were different. If you own an older home in Bloomington, Edina, St. Louis Park, or the surrounding areas, your original flashing may have been installed using methods that were standard then but wouldn’t pass inspection today. These older installations aren’t necessarily bad, but they do need more careful monitoring as they age.
Common Mistakes Homeowners Make with Roof Flashing
After years of inspecting roofs across the Twin Cities, we’ve seen the same mistakes come up again and again. Avoiding these can save you significant money and headaches:
- Ignoring Regular Inspections: The “out of sight, out of mind” approach to roofing is expensive. Your roof is up there taking a beating every day, and small flashing problems become big water damage problems when left unaddressed. A simple visual inspection from the ground with binoculars twice a year—once in spring after the snow melts and once in fall before winter—can catch issues early. An annual professional inspection is even better.
- DIY Flashing Repairs: We get it—YouTube makes everything look easy. But flashing repair is trickier than it appears. Improper overlap, wrong sealant choice, or inadequate fastening can actually make problems worse by creating new water entry points or directing water in unexpected directions. If you’re going to DIY, stick to simple tasks like cleaning debris away from flashing. Leave actual repairs to professionals who do this daily.
- Assuming New Roof = No Problems: A new roof is only as good as its installation. We’ve seen homes with brand-new roofs develop leaks within months because the flashing was done poorly. If you’re getting a new roof, pay attention to how the crew handles flashing details. Ask questions. A reputable contractor will welcome your interest rather than brush you off.
- Using the Wrong Materials: Not all flashing materials work in all situations. Mixing metals can cause galvanic corrosion. Using aluminum flashing against brick (which is alkaline) can cause premature failure. Using cheap rubber pipe boots that crack after a few years of sun exposure leads to predictable leaks. Material choice matters, especially in our climate.
- Over-Reliance on Caulk: Caulk is a sealant, not a structural solution. If your flashing needs major caulk repairs every few years, the underlying installation is probably wrong. Properly installed flashing relies on overlapping and gravity to shed water, with sealant as a secondary backup—not the primary waterproofing method.
- Ignoring Chimney Maintenance: Your chimney’s masonry needs maintenance too. Cracked mortar lets water behind your counter flashing, no matter how well that flashing was installed. If your chimney mortar is deteriorating, flashing repairs alone won’t solve your leak problems.
Your Action Plan: Keeping Flashing in Good Shape
Here’s a practical, step-by-step approach to protecting your home from flashing failures:
- Schedule an Annual Professional Inspection: Yes, you can spot some problems from the ground. But a professional on your roof can see things you can’t—lifted flashing edges, hairline cracks in sealant, early corrosion, and subtle signs of water intrusion. The best time for this inspection in Minnesota is fall, before winter weather arrives. This gives you time to address any issues before snow and ice make repairs difficult.
- Do Your Own Visual Checks: Twice a year, walk around your home and look at your roof from the ground. Use binoculars if you have them. Look for obvious problems: missing or lifted flashing, visible rust, gaps around your chimney. Inside, check your attic (if accessible) for signs of water staining, especially around penetrations and where the roof meets walls.
- Keep Your Roof Clear: Don’t let leaves and debris accumulate in valleys or around chimneys. This simple maintenance step prevents moisture buildup that accelerates flashing corrosion. Clean your gutters regularly too—backed-up gutters can cause water to pool at roof edges, stressing drip edge flashing.
- Address Small Problems Immediately: A small flashing repair caught early might cost $200-400. Water damage from an ignored leak can cost $10,000 or more. When you spot a problem or a professional identifies an issue, act on it. Delays are expensive.
- Consider Upgrading Vulnerable Flashing: If your home has older galvanized flashing that’s showing its age, or cheap rubber pipe boots that are cracked, proactively replacing them during good weather is much better than emergency repairs during a rainstorm. When replacing, consider upgrading to more durable materials—copper for chimneys, higher-quality EPDM or TPO boots for pipe penetrations.
- Prevent Ice Dams: Since ice dams put extra stress on flashing, preventing them protects your flashing too. This means proper attic insulation and ventilation so your roof deck stays cold and snow doesn’t melt from underneath. If ice dams are a recurring problem, address the root cause rather than just dealing with the symptoms.
- Keep Records: Document your roof’s age, who installed it, and any repairs that have been done. This history is valuable for understanding what to watch for and is helpful if you ever need warranty service or sell your home.
Ready to Get Your Flashing Checked?
If you’ve made it this far, you know more about roof flashing than most homeowners ever learn. That knowledge is valuable—it helps you ask the right questions, spot potential problems, and make informed decisions about your home. But at some point, you need eyes on your actual roof, and that’s where having a contractor you trust makes all the difference.
Here at Owl Roofing, we’re a family-owned company based right here in Shoreview. Tim and Bea Brown, Noah and Anya Bergland—we’re your neighbors, not a franchise or storm chasers passing through town. With over 15 years of combined experience on Twin Cities roofs, we’ve seen every type of flashing failure Minnesota weather can cause: corroded chimney flashing in Roseville, failed pipe boots in Maplewood, lifted step flashing in Woodbury. We know what works in our climate and what doesn’t.
When we inspect a roof, we look at the flashing details that other contractors rush past. We tell you exactly what we see—the good and the bad—and if repairs are needed, we explain your options in plain English. No pressure, no scare tactics. Just honest information so you can make the best decision for your home and budget.
If you’re concerned about your flashing, have noticed water stains you can’t explain, or just want peace of mind before another Minnesota winter, give us a call at 651-977-6027 or visit us at owlroofing.com/. We’re happy to take a look and let you know where you stand. Because when it comes to your roof, knowing is always better than wondering.
Protect Your Nest.
📍 Owl Roofing Serves the Entire Twin Cities Metro
Andover · Anoka · Apple Valley · Arden Hills · Big Lake · Blaine · Bloomington · Brooklyn Center · Brooklyn Park · Burnsville · Champlin · Chanhassen · Chaska · Columbia Heights · Coon Rapids · Cottage Grove · Crystal · deephaven · Delano · Eagan · East Bethel · Eden Prairie · Excelsior · Farmington · Forest Lake · Fridley · Golden Valley · Ham Lake · Hastings · Hopkins · Hugo · Inver Grove Heights · Lake Elmo · Lakeville · Lino Lakes · Mahtomedi · Maplewood · Mendota Heights · Minneapolis · Minnetrista · Mound · Mounds View · New Brighton · New Hope · North Oaks · North St. Paul · Oak Grove · Oakdale · Plymouth · Prior Lake · Ramsey · Richfield · Robbinsdale · Rosemount · Roseville · Saint Paul · Savage · Shakopee · Shoreview · South St. Paul · St. Louis Park · St. Michael · St. Paul · Stillwater · Vadnais Heights · Victoria · Waconia · wayzata · West St. Paul · White Bear Lake · woodbury
Licensed Minnesota roofing contractor · Free inspections · 10-year workmanship warranty · Get a free estimate →
